【美国大学生发绿豆芽】三种方法的比较:经验、教训和小窍门

绿豆芽好吃又好发越来越受大家的欢迎。今天我向朋友们介绍我们春季种菜班是怎么发绿豆芽的。成功的经验和失败的教训一并奉上。
发豆芽的绿豆最好是当年或者前一年的绿豆。时间放长了绿豆的发芽率会降低。
在发绿豆芽之前先将绿豆用温水浸泡610个小时。水的温度不能太高否则会烫伤绿豆影响发芽率。用手摸一下水不烫手就可以。
我们种菜班用了三种不同的方法发绿豆芽。
第一 用蒸笼。这是我们用的不锈钢蒸笼。在蒸笼上铺纱布喷一些水将绿豆摊平盖好纱布将纱布喷湿再压一个碟子。我们在蒸笼上套了一个纸箱子尽量减弱光线。没有光线发的绿豆芽洁白如玉更好吃一些。
接下来的几天每天用自来水淋洗绿豆12次。这是过56天之后绿豆芽的样子。
教训#1绿豆放得太多了。堆积在一起的绿豆不能散热有的豆子长了霉菌。不过大部分绿豆芽还是可以吃的。
我们在蒸笼里试发了第二次绿豆芽。这次的绿豆芽要好得多。学生们开心地收获绿豆芽。
教训#2: 发绿豆芽最好用厨房用的湿纸巾不要用纱布。发过绿豆芽的纱布上长满绿豆根很难清洗干净。
教训#3: 我们用的碟子太重应该用轻一点的。用一块轻塑料板可能更好。
第二土培。两个育苗托盘一个有漏水孔一个没有漏水孔。在有漏水孔的托盘里装1/3潮湿的育苗土整平。撒绿豆盖一层薄薄的育苗土喷水。在接下来的几天里保持湿润不需要每天淋水。过了7天之后的绿豆芽。
这个方法发的绿豆芽似乎更粗壮一些但与蒸笼发芽相比没有可圈的优点因此建议不用营养土发绿豆芽。
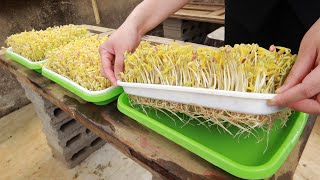
第三育苗托盘加湿巾纸。两个育苗托盘一个有漏水孔一个没有漏水孔。在育苗托盘上铺几层纸巾将纸巾弄湿。铺浸泡过的绿豆薄薄的一层即可。盖纸巾喷水将育苗托盘放在纸箱里避光。接下来几天需要每天淋洗绿豆1次。
这是5天之后的绿豆芽又肥又壮。我觉得这是三种方法中最好的最简单。朋友们在育绿豆芽的时候可以参考。
这是一个学生用绿豆芽做的美食。喜欢种菜的人都是吃货。
Mung bean sprouts taste great and are easy to grow. In this video, I will show you how our gardening class grew mung bean sprouts. Plus tips and lessons learned.
Use mung bean harvested from current or previous season. Mung bean stored for too long has low germination rate. Soak mung beans for 610 hours with lukewarm water. Be sure not to use hot water. Hot water will burn the beans and lower germination rate. How hot is too hot? It is too hot to mung beans if it is too hot for your hand.
We used three different ways to grow mung bean sprouts
1. Steamer.
This is my steamer I use for steaming glutinous rice for making rice wine at home. Spread cheesecloth. #50 is commonly used for growing microgreens. Wet the cheesecloth. Spread mung beans evenly on cheesecloth. Tuck in the cheesecloth snugly. Spray with water. Place a heavy plate to make sprouts grow stronger. The steamer was put under a box to reduce light level. Mung bean sprouts made in darkness look and taste better. Mung beans were rinsed 12 times a day.
This is what our mung bean sprouts look like in 56 days.
Lesson#1: My bad! I asked students to put in too much mung bean. There were some moldy mung beans because of overcrowding. Most sprouts were still good to eat.
We had a second try with only a thin layer of mung beans. The outcome was much better. Everybody got to take some sprouts home!
Lesson#2: Use paper towel instead of cheesecloth. It is hard to clean the roots off cheesecloth afterwards.
Lesson#3: The plate we used is a little too heavy and curvy.
2. Potting mix (Soil)
Two plastic trays. One with drainage holes and one without. Add some moist potting mix to the tray with drainage holes. Spread soaked mung bean. Cover mung beans with a thin layer of potting mix. Spray water to wet the potting mix. Keep the potting mix moist in the following days. No need to rinse.
These are mung bean sprouts in the tray in 7 days. These sprouts seemed thicker than those grown with the steamer method, but no real advantage over the steamer method. It is advised against using this method for growing mung bean sprouts.
3. Wet paper towel in trays
Two plastic trays. One with drainage holes and one without. Spray some paper towel. Wet the paper towel. Spread thin layer of soaked mung beans. Cover mung beans with more paper towel. Another round of spraying. Place trays in a box. No opening. No moving. Rinse mung beans with water daily. Mung bean sprouts were ready in 5 days!
Mung bean sprouts grown using this method are thick. This is the best of all three methods used in this class. It is therefore recommended for growing mung bean sprouts.
This is a mung bean dish prepared by a student in the class. This year’s gardening class is not only good at growing microgreens, but good at cooking as well.
Background music:
Brandenburg Concerto No41 BWV1049 Classical Whimsical by Kevin MacLeod is licensed under a Creative Commons Attribution 4.0 license. https://creativecommons.org/licenses/...
Source: http://incompetech.com/music/royalty...
Artist: http://incompetech.com/