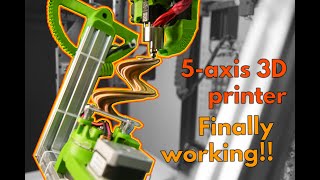
Adding touchscreen to my 5-axis 3D Printer!

Hi there! In this video, I'll show you how I added a capacitive screen to my 5axis 3D printer, enhancing its usability and aesthetics. I'll cover the hardware modifications, software setup, and design tweaks I made, including lessons learned from reworking cables and creating a custom case.
Elecrow site affiliate link: https://www.elecrow.com/affiliate.htm...
Capacitive touch screen link: https://www.elecrow.com/rc050shdmi5...
Please consider supporting my work on Patreon: / engineerunleashed
Commands to get KlipperScreen working:
1) Update and Upgrade Your System
sudo apt update
sudo apt upgrade
2) Install Necessary Dependencies for Moonraker
sudo apt install git python3pip virtualenv
3) Clone and install Moonraker
git clone https://github.com/Arksine/moonraker.git
cd moonraker
./scripts/installmoonraker.sh
4) Edit the Moonraker Configuration File according https://moonraker.readthedocs.io/en/l...
5) Move Klipper Configuration
mv /path/to/old/klipper/config /path/to/moonraker/config
6) Clone and install KlipperScreen
git clone https://github.com/jordanruthe/Klippe...
cd KlipperScreen
./scripts/installklipperscreen.sh
7) Reboot Your Raspberry Pi
sudo reboot
Note: These are general steps that may vary depending on your particular situation. Please keep in mind that this is not intended to be a tutorial.