AIR CONDITIONER DETAIL INSTALL |SPLIT DUCTLESS AC HEATING INVERTERMINI PUMP SYSTEM SETUPDIY HOW TO

used materials and tools:
air conditioner set: https://amzn.to/3gbk51o
alternative air conditioner set: https://amzn.to/2DTDEyl
ac rubber mounts: https://amzn.to/2EiihX1
level: https://amzn.to/3kRzSGe
folding ruler: https://amzn.to/2Yb1Key
Boschhammer: https://amzn.to/2Q2asaD
drill bit set: https://amzn.to/315B3Ka
wet & dry vacuum cleaner: https://amzn.to/317qZAI
rawlplugs: https://amzn.to/34c6EMy
screw set: https://amzn.to/2CD0PfF
compact bosch drill: https://amzn.to/313OJ8H
long masonry drill: https://amzn.to/2Q97wsJ
concrete shank drill bit: https://amzn.to/2Q2jPXV
insulated screw driver: https://amzn.to/3aAuWRx
torque wrench: https://amzn.to/3h7lJ5n
crowfoot set: https://amzn.to/3gebdZ6
⅜” wrench adapter: https://amzn.to/3axejWO
adjustable wrench: https://amzn.to/314T8rN
duct tape: https://amzn.to/3g1gZNu
pipe insulation tubing: https://amzn.to/2E9ZQ79
insulating foam spray: https://amzn.to/3g5xkAH
HT pipes: https://amzn.to/2CFKMh6
wrench socket set: https://amzn.to/2QfRXQp
cable consealer: https://amzn.to/2PYVWR8
vacuum hand pump: https://amzn.to/3axeX6G
These links are Amazon affiliated. If you buy something through these links, I'll get a commission, of course without you having to pay more. I hope you liked the video, thanks for your support!
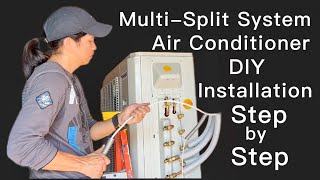
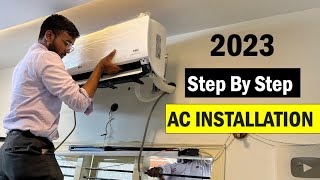
Hello here is Carl the landscape guy. In my new office I’m installing a split air conditioner system, that will be used for both heating and air conditioning. The model I chose is a 9,000 BTU 2.6 kw precharged inverter kit. Among other things, the manufacturer advertises that this system saves energy and is very quiet. It has an antibacterial coating on the fins, works with a new, environmentally friendly refrigerant and can be controlled via WLAN with a smartphone app. This system comes with the coolant prefilled unit, 9 feet of refrigerant piping, and small parts such as a feedthrough tube, insolation tape, sealant and rubber mounts. There is also the outer wall bracket, which I will show you later, when it comes to the assembly of the outside unit. Then here we have the indoor unit, which is very light. It comes with a cable that will connect both units. It also includes the manual, the remote control and a wall holder for it. Both devices seemed to have been wellpacked and arrived undamaged. This is the back of the wall mount. The indoor unit will go on this brick and concrete wall. I measure the distance between the holes of the wall bracket from the outer edge of the unit. Horizontally, the plate is slightly adjustable. A minimum distance of half a foot from the ceiling must be kept so that the air can flow properly. I draw the height of the upper holes with the help of a level. The wall bracket can be easily detached from the plastic unit. It clips on at the bottom. I use the bracket to mark all holes exactly. I use a 5 mm masonry drill with a Bosch Hammer to make the holes. When drilling indoors I use the Kärcher wet & dry vacuum cleaner to catch most of the dust. In case you are interested, I will link all tools below in the video description. By the way, the rawl plugs and screws were not included. Now I will prepare to drill the 65mm hole in the wall. First I mark the position of the hole. You will find the distances for the hole in the installation manual, they are different for each unit. I use a long masonry drill to predrill the shank hole. I make sure that the hole is angled on a downward slope. When the guiding hole is all set, I set up the 65mm concrete shank drill bit and start making the hole little by little. Every few inches I empty out the drill. I drill from the inside out as far as I can get. This wall is 40 cm thick. You can get a longer drill bit or drill from the outside. Thanks to the guide hole, I know where to drill. I am making sure the inner and outer holes are matching up nicely. This drill bit wasn't that expensive and it worked pretty good so I will link it in the description. Now, it’s time to go back inside. I connect all cables and wires to the indoor unit, starting with the power cable. Here you can open the maintenance cover, underneath is a cover for the power terminal. All wires are labeled which makes connecting very easy. The wiring on this unit is all set so now I reclose it. I lay the indoor unit on the floor so that I can lay all the cables out and line it up directly under the hole in the wall. Next, I roll out the copper lines and try to get them as straight as possible. Next I will connect the coolant lines to the inside unit. I have to bend the connection lines and this should only be done once and not bent back and forth otherwise the lines can break.
#aircondition #diy #ac


![Couple Installs Mr. Cool MiniSplit [FULL INSTALL]](https://i.ytimg.com/vi/RLtAGb8eN8Y/mqdefault.jpg)