Bleeding hydraulic MTB brakes Tutorial 11 ERRORS | Shimano Deore SLX XT XTR | MTBT

Shimano Deore SLX XT XTR bleeding brakes tutorial 11 common mistakes on bleeding mountain bike brakes
Shimano Bleed Kit
https://amzn.to/39L9xTS
Shimano Mineral Oil
https://amzn.to/2wwdWfc
✍ SUBSCRIBE TO THE CHANNEL SUBSCRIBE ✍
/ mountainbikingtube
☀☀☀ FOLLOW ME ON FOLLOW ME ON ☀☀☀
▶ STRAVA: / strava
▶ FACEBOOK: / mtbt123
▶ INSTAGRAM: / mountainbikingtube
▶ TWITTER: / mtbtube
▶ SITE: http://www.mountainbikingtube.com
▶ SITE: http://www.mtbtshop.com
✉ MAIL: [email protected]
If you use the bike a lot, the bleeding should be done every 12 months, otherwise every 18
Shimano uses a mineral oil which has the advantage of being hydrophobic, which unlike the HYDROSCOPIC one such as that used by SRAM, does not absorb moisture and is more stable over time
Very important thing, before starting
1) make sure that the bike is acclimated to the environment, what it means, if you have the bike in the garage at 3 degrees, take it home and start the procedure this is not a good thing. The oil expands with heat, so before you start wait for the temperature of the fluid to adapt to that of your home
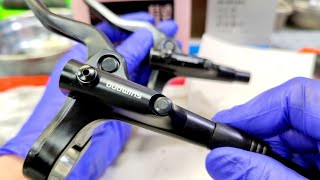
2) Assure to have a 'bleeding block' which is the thickness to put inside the pliers. This will prevent the brake caliper from being sunk during the bleeding operation. The Transport Lock that is used for the transport of the bike and that fits into the pads when removing the wheel is not good because it is not thick enough
3) Make sure that the calipers are centered and that the pistons work well and are not blocked by dirt. I made a video about it, if you are interested click on the link above
4) The pads must not be worn, otherwise after this operation, the brake lever may sink too much. Having the new pads instead, the sinking of the brake lever will be optimal
5) The position of the bike varies according to the bleeding of the front and rear brake. Proper positioning will prevent the formation of bubbles
6) The bike must be cleaned, especially the areas around the pistons and the brake levers, to prevent any impurities from entering the system
7) The bleeding accessories must be cleaned so every time you use them, be sure to clean them before putting them away
Remove the pads and push the pistons inside them, if the pads are worn and you will replace them, leave them inside and force them with a screwdriver
Bring the brake lever to the horizontal position and open the EBT cap, it is a small plastic cap and it is very delicate, so be careful not to force too much
Inside the glass put a little oil, not too much, clearly making sure that the cap is inserted
Insert the shot glass into the hole without forcing too much
Insert the long straw into the syringe and draw in 18 to 20 ml of oil (even a little more ste. Park tool reaches 3/4)
Remove the carpet on the clamp
Insert the syringe straw into the tube of the clamp and open the conduit with a wrench
Error 8: holding the syringe at the top and not at the bottom (8.40) suck in the oil and that's why we put the oil in the glass. This is to remove air bubbles from the tube
Error 9: WHEN YOU PUSH, DO NOT reach the end of the syringe, otherwise you run the risk of introducing air
Some recall the oil and reinsert it for 2.3 times, instead I limit myself to a single time, because I don't want to contaminate the new oil with the old one
Close the duct and remove the tube
The oil left in the syringe is clean and I put it back in the container
The one in the glass, I empty it with the syringe, so as to avoid disasters. I don't empty it completely, but I leave a little bit of it and I don't close it yet. This oil is contaminated and must not be reused. Do not disperse it in the environment but take it to the nearest ecological island
Error 10: at this point most people stop and remove the shot glass. Instead I open the brake lever completely by increasing the volume, in addition to this, with a screwdriver, I open this life, this also increases the volume of the brake lever.
This operation is used to completely free the duct from the air bubbles. Give the system a few taps and apply the brake
Reposition the levers halfway and close the screw halfway, and while closing, continue to staple, pat and staple
Now it's time to close the glass with the cap and remove it
Error 11: when you put the EBT cap obliquely. put the carpet back on the gripper
Close the lever as needed and the screw completely
Use degreaser to clean everything and reapply the pads