Building the KING of Birdy! | Rohloff

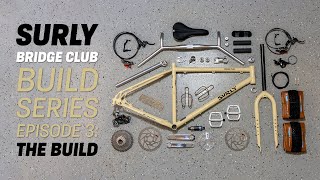
Enjoy this exclusive and thorough look into the process of constructing the "King of Birdy" from scratch! Follow along as Karno meticulously assembles parts from three separate boxes and checks them to ensure they meet our high standards of quality and safety.
Why do we build all our Birdy bikes from scratch? Well, that's so that we can offer customers a choice of 18 different frame colours. We're the ONLY bike company in the world to do so!
You can order a Birdy Rohloff online at : https://shop.mightyvelo.com/products/...
We ship our bikes worldwide with Fedex International delivery service.
If you'd like to test ride a Birdy Rohloff for FREE, come on down to our retail store!
30 Tai Seng Street
BreadTalk IHQ #0214,
Singapore 534013
OPENING HOURS:
MondaySaturday: 10am7pm
Closed on Sundays and Public Holidays
Alternatively, check out our online store: https://shop.mightyvelo.com/
Call us: 6694 7830
Click or Tap to WhatsApp us : https://wa.link/mightyvelo
Email: [email protected]
FIND US ON:
Linktree: https://linktr.ee/MightyVelo
Facebook: / mightyvelo
Instagram: / mightyvelo
Tiktok: / mightyvelo
Telegram: https://t.me/mightyvelo
Learn more on our websites:
https://www.mightyvelo.com
https://www.birdybicycle.com
https://www.pacificcarryme.com
Our Online Stores:
Shopee: https://shopee.sg/mightyvelo
Qoo10: https://www.qoo10.sg/shop/mightyvelo
Lazada: https://www.lazada.sg/shop/mightyvelo
Carousell: https://www.carousell.sg/u/mightyvelo
0:13 Building a Birdy Rohloff
0:22 Starting with the seatpost
0:29 Assembling the monocoque frame
0:45 Precision fitting of the headset
1:08 Installing headset bearings
1:25 Integrating handlebar stem and front fork
1:40 Mounting the handlebar
2:08 Inserting the internal cables
2:30 Trimming the shift cable
2:50 Preparing Rohloff gear pulley
3:28 Torquing the bottom bracket
3:38 Clamping on the chain tensioner
4:18 Calibrating the crank bolt
4:56 Torquing the pedals
4:59 Installing TRP disc brakes
5:17 Slotting in the rear derailleur hanger
5:32 Preparing the Rohloff hub for oil infusion
5:43 Drawing a precise amount of oil
6:00 Introducing oil into the Rohloff hub
6:23 Pumping the tyres to the right pressure
6:51 Torquing the Rohloff rotor for safety
7:00 Slotting the rear wheel into the frame
7:13 Mounting the Rohloff chain tensioner hanger
7:31 Torquing the front rotor bolts
7:42 Aligning the brake calipers
7:55 Feeding the chain through the gears
8:15 Spinning to check if everything’s in order
8:29 Installing the Rohloff gear pulley cable
9:02 Cycling through all 14 gears of the Rohloff hub
9:07 Keeping the cables tidy and organized
9:27 Ensuring perfect disc alignment
9:44 Checking the critical clamp bolts for proper torque
10:00 Fitting the saddle
10:28 Installing the bell
10:32 Clipping and capping excess cables
10:40 Finished!
#Birdy #BirdyBikes #FoldableBike #Cycling #Bicycle #bikebuilding #bikeinstallation #cyclinglife #birdybicycle #foldablebikes #foldablebicycle #cycle #assembly #BirdyBike #MightyVelo #FoldingBike

![[MV Chats] Wei Choon and his Birdy City!](https://i.ytimg.com/vi/AZPEdUUd1dc/mqdefault.jpg)