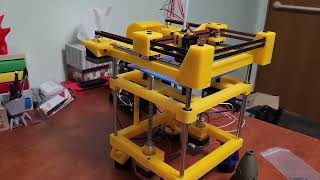
DIY 3D Printer - Part 1 - Frame Assembly

in this video we are going to assemble the frame for our DIY 3d printer
the frame consists of 7 pieces of aluminium extrusion profiles of 20x20mm and 20x40mm size
the lengths required are:
20x40mm 150mm length 2 pcs
20x20mm 380 and 400mm length each
20x40mm 400mm length 3 pcs
NOTE: Check back again for parts links and blog post link. thank you.
we will attach the frame using 90 degree corner brackets, m5x10mm bolts and m5 sliding nuts
we require 8 brackets and 16 sets of sliding nut and bolts
you can assemble the brackets in this way beforehand
take one 400mm 20x40 profile and mark it at 145mm from the end.
this is the length upto which we will attach our 150mm profiles
attach the profiles at a right angle using the brackets
do the same for the other side,
and slide the brackets in the main profile.
place it in such way that the profile meets our marking.
tighten the allen bolts and rotate the profile.
place the 2040 400mm profile on the right side and 2020 400mm profile on the left side , both vertical,
and fix them using the corner brackets.
place the 2020 380mm profile on the top and fix it using corner brackets
install the rubber feet under the frame so that the frame does not scratch the surface of the desk.
tilt the frame and attach the rubber feet to the ends of the frame, and tighten the allen screws.
place the frame upright, and we are done assembling the frame.
check the next part for the mechanical assembly.
Detailed Blogs:
Part 1: https://superbtech.in/howtomake3d...
Part 2: https://superbtech.in/diy3dprinter...
Part 3: Coming Soon
Part Links:
3d printed plates: https://bit.ly/3lYBEH0'>https://bit.ly/3lYBEH0
Frame:
2020 v slot silver profile: https://s.click.aliexpress.com/e/_AfevMf
2040 v slot silver profile: https://s.click.aliexpress.com/e/_AaQvCX
corner bracket 4 pcs set: https://s.click.aliexpress.com/e/_AOh4wr
ss button bolt: https://s.click.aliexpress.com/e/_AmeWQR
m5 sliding nut: https://s.click.aliexpress.com/e/_APaLMJ'>https://s.click.aliexpress.com/e/_APaLMJ
rubber feet set: https://s.click.aliexpress.com/e/_AoEFLV
Mechanical Parts:
V wheel Set: https://s.click.aliexpress.com/e/_9Jlqaf
3d printed plates: https://bit.ly/3lYBEH0'>https://bit.ly/3lYBEH0
gt2 belt pulley set: https://s.click.aliexpress.com/e/_9zTi5d
idler pulley: https://s.click.aliexpress.com/e/_AfzyTZ
flexible shaft coupling: https://s.click.aliexpress.com/e/_A36akx
lead screw with nut: https://s.click.aliexpress.com/e/_ANb1h1
Hotend Kit: https://s.click.aliexpress.com/e/_Ar2PQF
mk8 extruder right: https://s.click.aliexpress.com/e/_A0Lfeb
heated bed: https://s.click.aliexpress.com/e/_99Wtzp
glass bed: https://s.click.aliexpress.com/e/_AEPONd
bed spring set: https://s.click.aliexpress.com/e/_AmMexZ
Fasteners: https://s.click.aliexpress.com/e/_AEun4r
M5 Sliding Nut: https://s.click.aliexpress.com/e/_APaLMJ'>https://s.click.aliexpress.com/e/_APaLMJ
Electronic Parts:
Arduino Mega V3: https://s.click.aliexpress.com/e/_AXTXaL
RAMPS 1.6: https://s.click.aliexpress.com/e/_9HI3fl
128x64 LCD Display: https://s.click.aliexpress.com/e/_AmJ53d
DRV8825 Driver: https://s.click.aliexpress.com/e/_APjYyL
NEMA 17 Stepper Motor: https://s.click.aliexpress.com/e/_ASxbd1
Endstop Limit Switch 3 Pcs Set: https://s.click.aliexpress.com/e/_9Ai3D1
12V 20A Power Supply: https://s.click.aliexpress.com/e/_9AGjmx
12V Turbo Blower Fan 4020: https://s.click.aliexpress.com/e/_A8fOiP
DIY 3d Printer Part 1 Frame: • DIY 3D Printer Part 1 Frame Assembly
DIY 3d Printer Part 2 Mechanical(1/2): • DIY 3D Printer Part 2 Mechanical...
DIY 3d Printer Part 2 Mechanical(2/2): • DIY 3D Printer Part 2 Mechanical...
DIY 3d Printer Part 3 Electronics(1/2): • DIY 3D Printer Part 3 Electronics...
DIY 3d Printer Part 3 Electronics(2/2): • DIY 3D Printer Part 3 Electronic...
DIY 3d Printer Part 4 Firmware: • DIY 3D Printer Part 4 Marlin Firm...
DIY 3d Printer Part 5 Test Print: • DIY 3D Printer Part 5 Final Setu...
#3DPrinter #DIY #Arduino