etrailer | Transmission Cooler Installation - 2014 Nissan Frontier

Click for more info and reviews of this Derale Transmission Coolers:
https://www.etrailer.com/Transmission...
https://www.etrailer.com
Don’t forget to subscribe!
/ etrailertv
Full transcript: https://www.etrailer.com/tvinstalld...
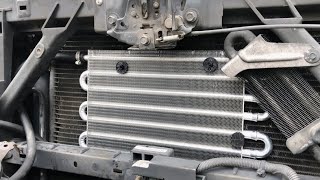
Today on our 2014 Nissan Frontier we're going to install the Derale Series 8000 plate fin transmission cooler kit, part number D13502. Now to begin our install we're going to go ahead and remove the front grille. To remove the front grille we'll need to remove the multiple push pin fasteners that hold it in place. To remove the push pin fasteners we'll pry up on the center of the fastener and then remove it completely, just using a thin flatbladed screwdriver. Now, behind the grille at the lower portion of it there are two more push pin fasteners, one on each corner. Go ahead and pry it free, then pull it out. Now with all our push pin fasteners removed, here along the bottom edge we just reach behind the front grille and gently pry it up on the six tabs to release them from the front bumper fascia.
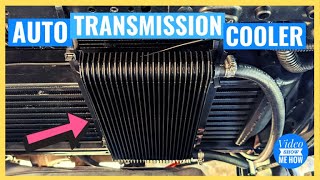
Now with our grille off we can here see the manufacturer's transmission cooler, and on this side we have plenty of room to install our new Derale 8000 plate fin cooler. To tie our Derale transmission cooler into the manufacturer's cooler, we can remove the manufacturer's hose from the manufacturer's cooler, extend the manufacturer's hose to run over to the new cooler, and a second line to come from the new cooler back here to the manufacturer's fitting. Now before we mount our cooler here to the core support I'm going to go ahead and install my hoses onto the cooler. We can remove the protector off the bottom of the cooler fitting. Now to assist in sliding the hose onto the fitting I'm actually going to go ahead and dip the hose into a little bit of transmission fluid just to help provide a little bit of lubricant, making it easier to get the hose onto the fitting. Then once my hose is onto the fitting, worm gear clamp provided, slide it up over the hose and tighten it down to secure the hose in place. Now with the first hose in place, if I set the cooler in position where it's going to be secured, I'll route my hose over to the manufacturer's cooler and check the hose length. As you can see, we've only got about a foot left, which won't be enough to run from our second fitting on the new cooler over to the manufacturer's connection point.
We'll remove the second fitting cover and add an additional piece of hose. We'll go ahead and install it onto the second fitting the same way we did the first. Now once our hose is in place we'll again slide on our clamp and tighten it down. Now with our hoses on we can go ahead and mount our cooler. Now using some selftapping screws I'm going to attach the new cooler directly to the core support. Just like that, we've got a good secure mount.
Here at the manufacturer's hose we need to remove the clamp. We'll take the clamp, slide it down on the hose out of the way so that we can take the hose off of the fitting. Now once our clamp's out of the way I'm going to go ahead and remove the fastener that's securing the hose here. Now before I completely remove the hose I'm going to go ahead and set up the line coming from the new cooler. It's going to go over to the manufacturer's fitting. I'll go ahead and make my final cut on the length, and I'm going to slide the hose clamp on, and then tighten it down so I don't lose it.
I'm just going to tighten it down enough to hold it in place so that the new hose is prepped and ready to go once I pull the manufacturer's hose off, I can slide the new hose on. Once I have the new hose slid onto the manufacturer's fitting I'll move my clamp up into place and tighten it down. Next we need to install a union into the manufacturer's hose so that we can connect it to the new hose that runs over to the new cooler. Supplied with our install kit is a suitable coupling to use. Once we have the hose in place we'll take the manufacturer's clamp and slide it up into position to secure it. Then the other side of our fitting will get our new hose that we can route over and cut to length. Just like we did our other hose, we'll slide our clamp onto the new hose and then install it onto the coupling. Then once in place we can tighten down our clamp to secure the coupling. Now with all our lines run and our connections made, I'm going to use some zip ties to secure it. Now once we have the hoses secured, cut off the excess from the zip ties to clean up the install look. It's recommended to start to vehicle, let it come up to operating temperature, and check for leaks. Now once we've checked for leaks and verified that we don't have any, we've completed our install and we're ready to go ahead and reinstall the front grille. Just like that, we've gone ahead and installed our new transmission cooler, put our