Fitting THE BEST netting to our modified cat
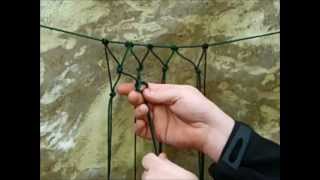
Not all multihull trampolines are created equal. In this episode, we are working on fitting the new Dyneema netting to make our trampoline. It is low stretch and extremely durable but a lot of work to install of course. Shayne shares how he approaches the tensioning of the netting (he has done a few nets in his rigging career from Gunboats and HH66 multihulls to 18ft skiff wings) and we love how the front of Paikea is now looking.
All the good bits for lashing your own nets
0:00 The start
01:08 Rod in the tube, this is what we lash to
02:00 Preparing the net for perimeter rope
03:14 Sizing the net to the boat. Sorry I missed a heap of details here
04:20 Getting all the kids helping :)
05:25 Measuring the lashing and some important woffle about nets
07:45 Why separate lashings are used for nets and a bit more bla bla bla
10:00 How often to tighten the trampoline followed by more bla bla bla
13:00 The sinching knot for attaching the lashings
14:25 I mess up a lashing because I talk too much....
15:15 Admiring all the hard work, it is finished
Materials we used for this project:
Dyneema netting from Netsystems https://www.netsys.com/
Edging 6mm dynex/dyneema with a dyneema cover (this cover is not essential)
lashing 2.5mm SK 78 cut to 900mm long lengths
metal rod 4mm 316 stainless steel
For more information on us check out our blog https://youngbarnacles.com/howtofit...
Join our membership program for more https://youngbarnacles.com/plans/all...
Or follow us on the socials :
On instagram https://www.instagram.com/youngbarnac...
On facebook / youngbarnacles
Click subscribe if you enjoyed this video and press that bell button if you would like to be notified every time we upload something new: