FREE 'Heated Madness' Blueprint Unlock in DMZ! (All 5 Attachment Locations on Koschei Complex)

Become a Covert Club Channel Member / @covertmf
Increase your KD by using Kontrol Freeks!
Code 'COVERTMF' FOR 12% OFF www.kontrolfreek.com/covertmf
Check out the Covert Merch Store!
https://covertmf.myshopify.com/
Or if you’d rather Show your Support with a Tip use the link below! https://streamlabs.com/ulteriorcovert...
Find others to play with or just come shoot the shit in my Discord Server / discord
FREE Heated Madness Kastov Blueprint Unlock in DMZ! (All 5 Attachment Locations on Koschei Complex) All 5 Heated Madness Attachment Locations in DMZ! (FREE Heated Madness Blueprint Unlock)
So Koschei Complex was added into DMZ this morning with Season 3 Reloaded and scattered around this new map are 5 different attachments for a blueprint called Heated Madness which is for the Kastov 762.
Each time that you can find and extract out with one of these attachments, that particular attachment will become available to use on the Kastov and once you’ve extracted out all five you’ll permanently unlock the blueprint.
In this video I'm going to show you the locations of all 5 of these different attachments so you can jump in and unlock this for yourself.
The second attachment is the Magazine. So from where the shop is located which is near the entry to the boss fight you’re going to want to head right and go up these stairs like you can see on screen at the moment and follow this passage right the way down into the defense research division room where you’ll want to take hard left and you’ll find it kind of hiding in the corner here.
Next is the Optic attachment and this is where things start getting a little tricky.
In the main chemical plant room you’re going to want to find the bunker that is labeled with what looks like a B1 above it and to open it you need to find a factory admin key which are quite commonly found within the chemical plant room.
This bunker has a couple of flooded sections you need to head through, The first is quite easy as the water doesn’t reach the roof in some areas so you can come up for air but you wanted to swim through until you find this hole in the roof you can jump through.
Once you jump up you need to be very careful as there are laser mines everywhere in here, To avoid them you just need to go prone and you can crawl under them and if you can find see the arming device you can interact with it to defuse them.
Once you jump up, head right and you’ll see a hole in the wall covered with plywood and you simply just need to use some explosives to blow this open and head inside. Here you’ll find another flooded area where you need to swim down, take the door on your first right and the optic will just be on the floor here.
Next is the grip attachment. This one is located in the server room which in the chemical plant area you’ll see is marked above the entrance with either c1 or c2. To open either of these doors you’ll need to place a car battery and jumper cables into the power supply which is just on the wall in between the two doors.
Before heading into the server room you’re also going to need to find 3 AQ laptops which you’ll just find randomly around the entire complex.
Once you have 3 of them then head into the main server room and what you need to do is check each of these servers that are up on higher ground. With the laptop you need to stand next to these and if you find the right ones you’ll be given a prompt to connect the laptop. Once you’ve done this to three of them then this is going to unlock a hidden door which is located in the corner of the server room. Simply jump up, unlock the door and right near the entrance you’ll find the Grip.
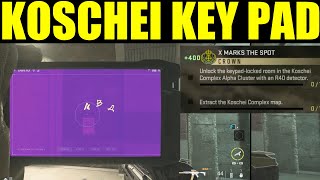
Finally is the Muzzle which is also located in the server room. First you need to find a R4D Dector which is a new tactical you can find within the complex and i believe one of these spawns every game in the room directly in the middle of the chemical plant.
Once you have one head into the server room and find the bunker, There’s two sentry guns directly in front of it which you’ll need to take care of then what you need to do is use this detector to look at the keypad and above you’ll see 3 symbols.
Around the server room are several different chalkboards, After looking at the symbols above the bunker keypad you’ll want to then head around the server room and look at these chalk boards with the detector to work out the code.
These chalkboards will be filled with all sorts of mambo jumbo but you basically want to be looking for one of your symbols on the board and if you find it you’ll see it has an arrow pointing to the number it represents.
Make sure to keep your numbers in the same order as the symbols and then head up to the keypad, enter the code and once the bunker door opens you’ll find the muzzle right next to this table on the ground.