How to Export CSV to Shapefile with Global Mapper | Step-by-Step Guide

Global Mapper is a popular GIS (Geographic Information System) software that can be used to convert data from CSV files to Shapefiles. To export data from a CSV to a Shapefile using Global Mapper, you can follow these steps:
Open Global Mapper:
Launch Global Mapper on your computer if you haven't already.
Load Your CSV File:
Open the CSV file you want to convert to a Shapefile. You can do this by going to File Open Data File(s). Browse to the location of your CSV file and select it.
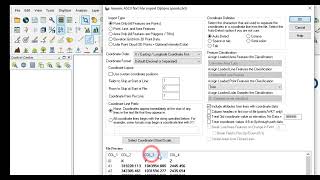
Set Up the Data Columns:
When you open your CSV file, Global Mapper will prompt you to set up the data columns. This step is crucial, as it helps Global Mapper understand the structure of your data.
Make sure to specify which columns contain the necessary information for creating the Shapefile (e.g., latitude, longitude, attributes).
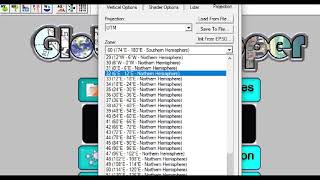
Set the coordinate system and any other relevant information about your data.
Display the Data:
Once you've set up the data columns, the CSV data should be displayed on the map.
Export Data to Shapefile:
To export the data to a Shapefile, follow these steps:
Go to the "File" menu.
Select "Export" or "Export Vector Data" (the exact option might vary depending on the Global Mapper version you're using).
In the "Export Vector Data" dialog, you can choose various export formats. For creating a Shapefile, you can typically choose "Shapefiles (*.shp)" as the export format.
Select the features or data you want to export. You can either export the entire layer or select specific features by using the digitizer tool.
Choose the location where you want to save the new Shapefile and specify a name for the Shapefile.
Click the "OK" or "Export" button to start the export process.
Set Shapefile Options:
Depending on the format you choose, you may be prompted to configure additional options for the Shapefile, such as coordinate system, attribute fields, and data type.
Review and Confirm:
Review the export settings and confirm that they match your requirements. Make any necessary adjustments.
Start the Export:
Once you are satisfied with the export settings, click the "OK" or "Export" button to start the export process.
Save the Shapefile:
Global Mapper will create the Shapefile at the specified location with the chosen name. You may need to specify the type of Shapefile you want to create (point, line, or area) and set any additional options.
Close the Export Dialog:
After the export is completed, you can close the export dialog.
Review and Edit (If Necessary):
Open the newly created Shapefile to review and edit it as needed. You can add, modify, or delete features and attributes.
Save Your Workspace:
To save your work and the new Shapefile, use the "Save Workspace" option under the "File" menu.
That's how you can use the "Export Data" option in Global Mapper to export your CSV data to a Shapefile. The exact menu labels and options might vary slightly depending on the version of Global Mapper you are using, but the general process remains consistent.