How to Fold a Parachute - for Drone UAV Model Rocket Storage | Annular Parachute Folding Tutorial

This method is best suited for annular parachutes (pull down apex parachutes). Learn more about our different types of rocketry, research, UAV and drone parachutes: https://shop.fruitychutes.com/collect...
We used a 96" Iris Ultra Compact parachute in this tutorial: https://shop.fruitychutes.com/product...
You can find written followalong steps for folding a parachute on our website: https://fruitychutes.com/help_for_par...
Tutorial on how to pack a deployment bag:
• How to Pack a Parachute Deployment Ba...
Fruity Chutes has been manufacturing premium quality parachutes since 2007. Our parachutes have established a solid track record for use in unmanned applications such as drones (including multirotor, fixed wing and VTOL), rocketry, RC control aircraft, balloon research, and more.
It’s important to remember that the user is responsible for ensuring their parachute is properly packed and that a suitable deployment method is provided. For insight on what parachute and deployment system pairing works for your situation, contact us: https://fruitychutes.com/contact_us'>https://fruitychutes.com/contact_us
Or send us an email: [email protected]
Like Fruity Chutes on Facebook: / fruitychutes
Follow Fruity Chutes on Twitter: / fruitychutes
Visit our Instagram: @fruitychutes | / fruitychutes
Click subscribe and never miss new tutorials and exciting demos for your Fruity Chutes gear!
Transcript:
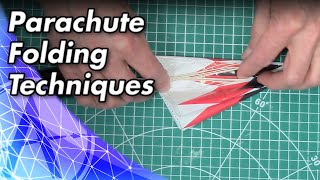
Welcome to this Fruity Chutes tutorial, where we’ll show you how to fold an Iris parachute. This is the same method we use when preparing to ship our parachutes to customers. You will need your parachute, a rigger jig, and weights. For this tutorial, we used a 96 inch diameter Iris Ultra Compact parachute.
Before you begin, set up your rigger jig. Lay the parachute on the table. The side of the canopy with the “Fruity Chutes” label should be on the left half of your work area.
Lengthen the shroud lines and connect the quick link of the bridle to an anchor point. This can be any heavy, immovable object, like a chair or table. This will help with lengthening and organizing the lines. Check if any of the lines are tangled. If so, detangle the lines prior to continuing.
Take the left and right groups of lines into separate bundles and guide them with the center pulldown up to the skirt of the canopy at the rigger jig. Set the left, center, and right groups of lines into their respective slots in the jig. Close the gate over the lines and apply moderate pressure while tightening the screws. Move your anchor point back until the lines are taught. If needed, add extra weight to your anchor.
Find the gore or fabric panel with the label. This is the first gore. Pull the seams taught through the center, and pull the gore out towards you so it lays flat on the table with the seam running up the center of your work area. Take the next gore, pull it over the first, and match the seams so they’re atop one another. Then pull the rest of the panel out and smooth it on top of the first panel.
Repeat this step for half of the total number of gores in your parachute. In this case, we’re using a 12 gore parachute, so we’ll organize and smooth 6 panels on each side. Once you complete one side, weigh down the fabric. Repeat this process on the other side.
Remove the weights. On each side, fold in the outer edge of the gores, then further fold the canopy into thirds. Use the weights as needed to hold the fabric in place. The parachute should now be a rectangle. Disconnect the lines from your anchor point and remove them from the rigger jig.
If you want to pack the parachute into a deployment bag, you can stop here and move on to our video showing how to pack a deployment bag. The link is in the description below.
If you want to store the parachute, continue by folding the canopy into itself, in quarters, toward the shroud lines. Then zfold the lines and secure them with tape.
And now you’re done! If you found this video helpful, leave a like down below, and subscribe to see more UAS recovery tests, demos, and tutorials. To learn more about the Iris Ultra Compact and Ultralight parachutes, as well as our other parachute models, go to https://fruitychutes.com/ or check out the links in the description (provided above this transcript).
#howToFoldAParachute #parachuteFolding #foldAParachute #foldADroneParachute #foldAModelRocketParachute