Make Better Drum Fills

Learn how to program better fills using our 4step method!
►FREE Book: https://HackMusicTheory.com/Books
►Drums PDF: https://HackMusicTheory.com/Drums
►Producing Course: https://HackMusicTheory.com/Bestsellers
0:00 Welcome
0:50 Introduction
1:40 Step 1. Ending
3:15 Step 2. Beginning
4:36 Step 3. Sketch
5:54 Step 4: Spread
7:32 The Example
7:48 The Djend
►3 Types of Drum Fills (Video): • 3 Types of Drum Fills
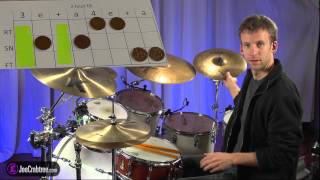
STEP 1 ENDING
The first thing you need to do is the last thing! It sounds counterintuitive, but drum fills take your listeners through a percussive journey that has a beginning and an ending. Once you’ve decided on these two points in your music, then you write a drum fill that connects them. It’s sad how many producers don’t think about these beginning and ending points, and merely start and stop their fills at the predictable places. But that won’t be you! So, how do you choose where to end your fill, and why do you have to choose the ending first? Well, the place where you end your fill will have an accent as a result, so you want to make sure that it’s a point in your music that you intentionally want to emphasize. Most producers end all their fills on beat 1, and while that’s a super strong place for an ending, when every fill ends on beat 1, it’s also super boring! Listen to your music, it will tell you where it wants you to end each fill. And remember, you can end your fills before beat 1 or after beat 1. A drum fill should only end on beat 1 if that’s exactly what your music wants at that specific point. In our example, we’re transitioning from the chorus to the bridge, so we need a notification fill to alert the listener to this upcoming change. The bridge has a natural accent on beat 2, so that’s definitely the best place to end our fill.
STEP 2 BEGINNING
Right, now that you know where your fill is ending, you can work backwards and figure out how long it needs to be and where it should begin. The way you choose a beginning point for your fill is different to how you just chose the ending. In this step, the first and most important thing to decide is how long your fill needs to be. There will be numerous naturallyoccurring accents in your music where you could start a fill from, so trying to decide that way will only confuse you. Instead, loop up a few bars on either side of where your fill is going to be, then listen. The music will tell you how long the fill needs to be, which in turn tells you where to begin it. And keep in mind, the length that your drum fill needs to be depends on which type of fill it is: variation, tension, or notification. Check out the 3 Types of Drum Fills lesson to learn all about that. Our fill is a notification fill, so it needs to be long enough to prepare the listener for the upcoming change, but not too long, otherwise it will build too much intensity. This led us to the perfect place to begin our fill: beat 2+ (in the last bar of our chorus). So, that makes our fill just less than one bar long.
STEP 3 SKETCH
Okay, so you know where your fill is ending, and where it’s beginning. Now it’s time to connect the dots! In this step, the first and most important thing to decide is the energy contour of your fill. Once again, this depends on which one of the three types of fills it is. But generally speaking, with your drum fills you’ll either want to increase the energy level, decrease it, or keep it moreorless the same. As we’re using a notification fill and going into a section with a higher intensity level, we need to increase the energy with our fill. To decide what your drum fill should do, loop up the same bars as you did before, close your eyes, and listen deeply. The energy contour will paint itself in your mind. Once you know what the energy needs to do, you can start sketching the fill. Tasty fills tend to have a variety of note values, so have fun experimenting with that. But, because a drum kit has so many drums and cymbals, it’s easy to get distracted by all the possible combinations. So to stay focused, we recommend sketching out your fill using only the snare drum.
►Continue Reading: https://HackMusicTheory.com/home/blog...
ABOUT
Hack Music Theory is the fast, easy and fun way to make music. Taught by awardwinning music lecturer Ray Harmony, and his protégé wife Kate. Ray has been teaching music theory for 25 years, and along the way he's made music with Serj Tankian (System Of A Down), Tom Morello (Rage Against The Machine), and many more!
COPYRIGHT & CREDITS
© 2021 Revolution Harmony
Revolution Harmony is Ray Harmony & Kate Harmony
Script & all music in video by Revolution Harmony
Book promo filmed & edited by Maurits Nienhuis
All stock footage courtesy of Pexels