Making Mini RC Tank It can Fire too !!

In this video I will show you how to make a mini remote controlled tank.
#tank #minitank #rctank
Behind the scenes, more technical information and vlog : / @bibinsagaramvlog6972
Facebook : https://www.facebook.com/sagarambibin...
Instagram : / bibinsagaramyoutube
My camera
A6400 : https://amzn.to/2Ks2bKl
Lens I am using
Sony E PZ 18105mm : https://amzn.to/3auKF2E
Sigma 30mm F1.4 : https://amzn.to/2VP9TDM
Sigma 16mm F1.4 : https://amzn.to/2XXFlSY
Link to the circuit diagram and the Arduino code : https://drive.google.com/drive/folder...
Arduino Bluetooth app : Bluetooth RC Controller
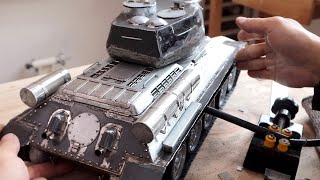
In this video I will be making this remote controlled miniature tank, which can also fire a projectile.
My plan is to make the circuit first and build the body of the tank around it. I will explain the circuit components in short. Drive motors are two 9g servos converted to gear motors. Also I have removed the circuit from the servo and gearing is changed to increase the output speed.
Brain of the circuit is an Arduino Nano. Two speed controllers are used for the motors. A Bluetooth module to receive the signal from mobile. A small modified 3.7 g servo for rotating the turret. And MOSFET for controlling the firing mechanism. Ignition for the firing mechanism is a thin fuse wire bridged across output wires from MOSFET.
Once the circuit is finalized, measurements are taken and the body of the tank is designed in Fusion 360. I have used diagrams of T14 Armata as reference while designing.
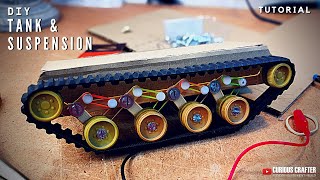
Most of the parts are 3D printed in PLA and the load bearing suspension components printed in ABS. Spring for the suspension is taken from an old winding toy car and the axle is made from a 4mm stainless steel tube. All sixteen idle wheels are made from PLA and the drive wheels are made from ABS. Wheel stops are also 3D printed in ABS. After assembling the idle wheels, two drive motors are fixed. Then Both halves of the body are glued together. A 3D printed circuit holder is also glued in the middle. A micro USB port is added in the back for charging the battery. My first plan for the track was to use 3D printed links, but it turns out that my 3D printer doesn't have the accuracy to print those small parts. Then plan B was to use a GT2 belt to make the track. But it turns out that those types of the tracks are too stiff. So I went with tracks made with an ID card tag having rubber strips glued in the middle. Now I have two big problems. Track is slipping from the drive wheel and the drive motors are stalling since they don't have enough torque. Guess what! because I changed the gearing. So I dismantled everything and swapped the drive motors with a new one without changing the gearing. Also I tested out different types of drive wheels and ended up using the one with spikes. Miraculously it worked like a charm.
Now let's make the top part of the tank. After spray painting it, the motor for rotating the turret is also fixed. Turret is driven by internal gearing. Power supply to the firing mechanism is also taken through the cover. The firing mechanism has three main components. Barrel is made from a stainless steel straw. Barrel and chamber have locking legs and can be locked by rotating 30 degrees.
When power is supplied, fuse inside the cartridge will burn the propellant firing the projectile. Main part of the cartridge is taken from an old Christmas light. I am highlighting each part in the diagram below while I am making it. Matchstick heads are used as propellant. Both the white colored part and projectiles are 3D printed in ABS. Diameter of the projectile is 4.5mm. Chamber has two brass contacts to give power to the cartridge. Turret doesn't have full 360 degree rotation due to the wires to the firing mechanism. I am using a blank cartridge to do a test fire. I have added a few extra things just for aesthetics. Tank weighs a total of 375 gram. Operational procedure goes like this, plug in the battery. Single click to switch it on and double click to switch it off. Plug in 5V USB to charge the battery, battery level is shown in the BMS circuit. Top cover can be screwed in place or press fitted.