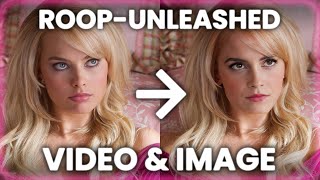
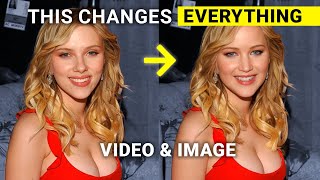
Mind-Blowing Deepfake Tutorial: Turn Anyone into Your Fav Movie Star! Better than Roop u0026 Face Fusion

#Rope is the newest 1Click, most easy to use, most advanced open source Deep Fake application. It has been just published yesterday. In this tutorial I will show you how to use Rope Pearl DeepFake application. Rope is way better than Roop, #Roop Unleashed and #FaceFusion. It supports multiface Face Swapping and making amazing DeepFake videos so easily with 1Click. Select video, select faces and generate your DeepFake 4K ultraHD video.
1Click Rope Installers Scripts ⤵
/ mostadvanced1105123768
How To Install Requirements Tutorial (Python, Git, FFmpeg, CUDA, C++ Tools) ⤵
• Essential AI Tools and Libraries: A G...
Official Rope GitHub Repository ⤵
https://github.com/Hillobar/Rope
Rope's Author Donation Link Support Him For Better APP ⤵
https://www.paypal.com/donate/?hosted...
0:00 Example Deepfake video from movie Inglourious Basterds 2009
0:21 Introduction to the most easy to use and most advanced 1Click Deepfake application Rope Pearl
0:53 How to download 1Click installer scripts and start installing Rope Pearl
1:34 What are the requirements of Deepfake app Rope Pearl and how to check and install them
1:44 How to check and verify your Python, Git, CUDA and FFmpeg installations
3:42 Example images and a test video that I prepared and sharing
4:10 How to start Rope Deepfake application after the installation has been completed
4:27 How to use Rope Pearl Deepfake application first select videos and images folders
5:00 How to refresh and repopulate selected videos and faces folders
5:26 How to set the outputs folder where the Deepfake videos and images will be saved
5:45 How Rope Pearl the most advanced Deepfake application work, select input video and target faces
6:34 How to make swapped, deep faked faces HD from low resolution
7:01 How to further improve face quality with face restoration AI models automatically
7:49 How to make additional changes to fix artifacts and mistakes in the Deepfaked video
8:27 Support link to support author of Rope developer
8:37 How to test and see each changes effect immediately
9:00 The tests and configurations I have preprepared for you
9:19 How to use Face Parser to fix the mouth movement
9:53 How to reduce VRAM usage and increase processing speed with number of threads
10:13 How to export and save Deepfake applied new video
12:12 Where will be the output / exported video saved
12:33 Important face detection models Retina face, Yolo and SCRDF try them if face detection fails
13:34 How to understand when the Deepfake video processing is completed
13:59 Properties of the generated Deepfake video, e.g. resolution, bitrate
14:24 How to Deep Fake / Face Swap images not videos
15:30 How to save deep faked images
15:43 What is auto swap and how to use it
16:10 How to find best working face before start processing the video
17:13 How to automatically install and use Rope DeepFake AI on a Linux system
Deepfake Tutorial: RopePearl Application for Face Swapping in Videos and Images
Installation
Download the installer files from the provided link in the video description
Extract the files to your desired installation location (e.g., rope_ai folder)
Ensure you have the necessary prerequisites installed:
Python 3.10.11
Git
FFmpeg
CUDA
Run the install.bat file to start the installation process
The installer will download the necessary models and set up a virtual environment
Using RopePearl for Video Face Swapping
Open RopePearl by doubleclicking the windows_start.bat file
Select the videos folder containing your input video
Select the faces folder containing the face images you want to use for swapping
Click "Start Rope" to refresh the interface with the latest files
Select the output folder where the processed video will be saved
Select the video you want to modify
Click "Find Faces" to detect faces in the video
Select the face you want to replace and the face you want to replace it with
Adjust the Swapper Resolution to enhance the quality (up to 512 pixels)
Enable the restorer and choose GPEN512 for best results
Finetune the blend ratio to make the face swap look more natural
Enable strength and adjust size border distance to fix errors
Use the Occluder and Face Parser to improve mouth movements and fix other issues
Set the number of threads based on your GPU's capabilities
Choose the output video quality
Click the record icon and then play to start processing the video with the face swap
Using RopePearl for Image Face Swapping
Switch to the image tab in RopePearl
Select your source image and click "Find Faces"
Select the face you want to replace and the target face
Enable "Swap Faces" and adjust settings as needed (Swapper Resolution, Restorer, etc.)
Use the "Auto Swap" feature to automatically apply the selected face to new images
Click "Save Image" to save the faceswapped image to the output folder
Additional Tips and Information
Try different face detection models (Retina Face, Yolo v8, SCRDF)


![I Replaced ALL my ADOBE APPS with these [free or cheaper] Alternatives!](https://i.ytimg.com/vi/5EfqHg49kMk/mqdefault.jpg)