PCBs in Two Hours? Zack Sucks at CNC

Can Zack stop smashing his bits long enough to make a circuit board?
Get your own Snapmaker CNC + Printer + Laser: https://shop.snapmaker.com/?rfsn=6333...
I called this the A350, but it's actually the AT model! Either way, it's also available on Amazon now! https://www.amazon.com/dp/B09G36C1Y2?...
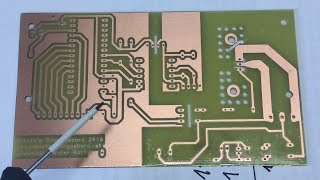
3D printing is fast. Fabricating circuit boards is not. If we can rapidly prototype circuit boards right here in the Lab, I might be able to escape the bottomless 3Dprinting pit of my own creation. The only problem: Milling circuit boards turns out to be way harder than I expected...
PSA: Using FR4 was a bad choice. I should have used FR1 (phenolic or bakelite) boards instead they're safer for longterm exposure.
My free printable models from this episode:
Slopboard drilling jig: https://bit.ly/3u90OH8
Snapmaker Vacuum Port + Clips: https://bit.ly/3thsbza'>https://bit.ly/3thsbza
CNC Bit Tray UwU: https://bit.ly/3thsbza'>https://bit.ly/3thsbza
Supplies and tools:
Tiny end mills: https://amzn.to/3MGiKRA
Alignment pins: https://amzn.to/3I64TAy
0.8mm drills: https://amzn.to/3t1INep
Sketchy SainSmart 0.1mm Vbits: https://amzn.to/3ML7h3w
Decent Huhao DualFlute Vbits: https://amzn.to/3I2XHoP
Collets for tiny mills: https://amzn.to/3J3UxCJ
Diamond pattern mills + more: https://amzn.to/3sZqJl5
Hose for chip extractor: https://amzn.to/3t3Em2Q
Doublesided copperclad FR4: https://amzn.to/3MGj8j0
Carpet tape (very sticky): https://amzn.to/36cYoil
Tiny rivets: https://www.ebay.com/itm/273600722201
How to Mill Circuit Boards with the Snapmaker:
0) If possible, print a dust extractor and hook it up to a powerful vacuum with a true HEPA filter. Open windows.
1) Print a slopboard jig. Use it to mark holes on a onefoot square of 3/4" MDF.
2) Drill 13/64" holes on the marks and countersink.
3) Remove your Snapmaker's slopboard and install the new one.
4) Use a 1/8" flat end mill to hog a big ol' square into it. 0.5mm depth, 200mm/min feed, one pass should be enough.
5) Slap some carpet tape on you copper clad and stick it to the bed.
6) Export Gerbers with 14 mil trace and space, 0.8mm minimum drill.
7) Import top copper, bottom copper, and drills into FlatCam. Note that you may need to scale the drills down to 0.1.
8) Use FlatCam's doublesided tool to mirror the bottom copper and generate alignment holes. Position the holes at least 5/8" from the board edge.
9) Create a drilling or milling job from the alignment holes, to fit your alignment pins. Make the holes as tight as you can fit the dowels into.
10) Generate a CNC job from the alignment drill/mill job. Make sure to put G21 in the End GCode. I recommend 0.5" depth, 0.1" stepdown, 10in/min feed. Save the resulting Gcode file with a .cnc extension.
11) Open the Gcode in a text editor and change the line F10 to G1 F10.
12) Install your selected drill or end mill, zero, and execute the job. DO NOT change the home position or remove the board.
13) Create drill and mill jobs from the Excellon file. I recommend drilling all holes 0.04" and smaller with your 0.8mm bit, and milling the rest with a 1mm diamondpattern mill. Depth is the thiccness of your board plus 0.05", stepdown all the way for drills and 0.1" for mills, 5in/min feed.
14) Generate CNC jobs for the drills and mills, generate Gcode, change the F[number] line to G1 F[number], mount and home the appropriate drills or mills, and run the jobs.
15) Install a Vbit or micro end mill and home Z very, very carefully. DO NOT change the X or Y origins. Check the Z in multiple places with a slip of paper to make sure the board is flat. Your Z origin should be at the lowest point on the board.
16) Generate isolation routing for the top layer. A 20degree 0.1mm bit effectively has an 0.012" diameter. I found that one width pass was OK. Look for shorts that the tool can't cut!
17) Generate a CNC job from the isolation routing. I got the best results with an 0.002" depth, 5"/min feed, one pass. Travel Z and spindle speed are irrelevant.
18) Output Gcode, change F to G1 F, import into Luban.
19) Apply a thin layer of cutting fluid or light machine oil to the copper clad. Be careful not to let it soak into the slopboard.
20) Run the top copper job.
21) Remove the copper clad from the slopboard, peel off the tape, degrease thoroughly, apply fresh tape to the newlycut side, and use dowels to pin copper clad to slopboard upsidedown. Remove the pins and zero the tool again!
22) Grease up the board, generate the bottom isolation Gcode, and run it.
23) Swap in an end mill. Generate cutout Gcode FROM THE BOTTOM COPPER, NOT THE TOP COPPER! Use the same settings as the alignment holes, and run the job.
24) Remove board, carefully cut out with moistened tools, clean board, and populate!
25) Use damp rags to thoroughly clean all fiberglass dust.
Interference SFX by Partners in Rhyme
Other SFX from www.zapsplat.com