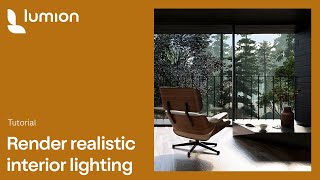
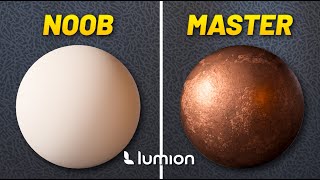
PHOTOREALISTIC RENDERING IN LUMION 11 - Detailed Preset Walkthrough!
In this video, we talk about how we can quickly create camera settings in Lumion 11 to create a photorealistic result! All Settings Listed Below!
WANT MORE REALISTIC MATERIALS? CHECK OUT MY PBR MATERIALS GUIDE!
http://www.therenderingessentials.com...
SETTINGS
Real Skies –
Sky 1
Heading – 142 degrees
Brightness – 1
Overall Brightness – 1
Shadow –
Sun Shadow Range – 1400
Coloring – 1.6 – Gives me cooler shadows
Brightness .1
Interior/Exterior .9
Omnishadow – 100%
Shadow Type – Normal
Fine Detail Shadows – On
Exposure – Use this to control the overall brightness of your scene
Value .4
Analog Color Lab –
Style 1.7
Amount .2
Color Correction –
Temperature .2
Tint – 0
Vibrance – 1
Brightness .5
Contrast .7
Saturation – 1
Gamma Correction – 1.1
Limit Low – 0
Limit High 1
Noise –
Intensity .1
Color – 0
Size – 1
Sharpen –
Intensity .4
Hyperlight – 40%
Reflection – Varies
Skylight just adds a bit more light in corners, etc
Brightness – 1.4
Saturation – 1
Chromatic Abberations –
Dispersion .1
Affected Area All
MY PC SPECIFICATIONS
https://kit.co/TheSketchUpEssentials/...
Check Us Out on
Website http://www.therenderingessentials.com
Twitter / easyrenders
Disclaimers: all opinions are my own, sponsors are acknowledged. Product Links in the description are typically affiliate links that let you help support the channel at no extra cost.
TIMESTAMPS
0:00 Introduction
1:33 Starting to Build our Scene
1:45 Saving Effects Files
2:20 Real Sky Settings
2:25 Shadow Settings
3:47 Exposure Settings
4:15 Analog Color Lab Settings
5:03 Color Correction Settings
6:14 Adding Noise
6:40 Image Sharpness Settings
7:12 Hyperlight
7:32 Reflection Planes
8:30 Sky Light Settings
9:02 Chromatic Abberations
9:55 Saving Our Effects File
10:21 Exporting a Rendered Image
10:49 Copying Lumion Scene Settings to a New Scene