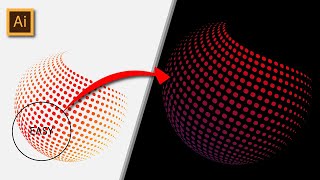
Shell Design(Abstract) in Adobe Illustrator | Tutorial | Easy

Hello everyone,
Keshav here from @SoNgShuBSplendour design,
In this tutorial, i will guide you through the steps of creating a beautiful shell design in Adobe Illustrator. This tutorial is perfect for anyone who loves natureinspired designs and wants to learn how to create them digitally.
Step 1: Setting up the Document
Open Adobe Illustrator and create a new document. Set the size to your desired dimensions and choose a color mode that is appropriate for your design.
Step 2: Drawing the Basic Shape
Using the Ellipse Tool, draw a small circle for the base of the shell. Then, using the Pen Tool, draw a curved line that starts from the center of the circle and extends outward to create the shape of the shell.
Step 3: Adding Detail
Use the Pen Tool to add details to the shell, such as the ridges and bumps that are typically seen on a real shell. You can also experiment with different shapes and sizes to create a unique design.
Related Hashtags: #AdobeIllustrator #ShellDesign #GraphicDesign #NatureInspiredDesign #CreativeDesign #DesignElements #VisualArt #DigitalArt #DesignTutorial #DesignTips #DesignTricks #IllustratorTricks #IllustratorTips #DesignEducation #DesignInspiration #DesignIdeas #DesignCommunity #DesignTrends #DesignProcess #DesignThinking #DesignChallenge #DesignFun #DesignLovers #DesignAddict #DesignIsLife #DesignGoals.
Step 4: Coloring the Design
Once you are satisfied with the shape and details of the shell, it is time to add color. Use the Eyedropper Tool to select a color from an image or color palette that you like. Then, using the Fill Tool, fill in the shell with your chosen color.
Step 5: Creating a Gradient Effect
To add more depth to the design, you can create a gradient effect on the shell. Select the shell and go to the Gradient panel. Choose the Gradient Tool and adjust the colors and angle to create a realistic gradient effect.
Step 6: Adding Shading and Highlights
To create a more realistic 3D effect, add shading and highlights to the shell. Use the Gradient Tool to add a darker shade on one side of the shell and a lighter shade on the other side. You can also add a white highlight to the top of the shell to create a shiny, reflective effect.
Step 7: Finalizing the Design
Once you are happy with the design, you can add any final touches, such as shadows or additional details. Then, export the artwork as a highresolution image file to use for printing or digital media.
And there you have it! With these simple steps, you can create a beautiful shell design in Adobe Illustrator. Experiment with different shapes, colors, and effects to create your own unique designs inspired by nature