Teardrop Trailer build Part 4: Installing Insulation in the Teardrop Trailer

Welcome to Orkies Workshop!
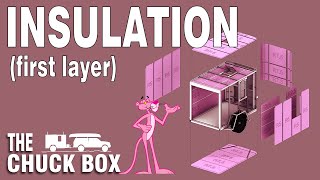
In this episode, we’re tackling the insulation process for our teardrop trailer build! Learn how to laminate insulation layers, clamp them securely, and use kerf cutting to fit around the trailer’s beautiful curves. We’ll also show you a simple fix if your insulation isn’t fitting perfectly. Once the insulation is in place, we’ll apply the final layer of plywood, prepping the shell for fiberglass. And don’t miss our surprise window additions! Plus, we’re doing it all with easytofind tools—no need for expensive machines.
Kerf Cutting Website
https://www.blocklayer.com/kerfspacing
Let's have a coffee:
https://buymeacoffee.com/orkiesworkshop
/ orkies_workshop
/ @orkiesworkshop
In this video, you'll see:
Whether you're a seasoned DIYer or just starting your first big project, join us on this exciting journey as we transform a basic trailer into a cosy, roadready teardrop camper. Don’t forget to subscribe and hit the notification bell to follow every step of this build series!
Chapters:
Here are some chapter titles and descriptions for your video based on your list:
00:00 Insulation Installation on the Teardrop Trailer
In this section, we start by applying the first layer of insulation to the trailer. We’ll guide you through how to measure and cut the insulation panels, ensuring a snug fit inside the trailer’s walls.
01:30 Kerf Cutting the Insulation
To get the insulation around those beautiful curves, we’ll demonstrate how to perform kerf cuts. Watch as we make precise cuts in the insulation to give it the flexibility it needs to bend smoothly around the trailer’s curved edges.
02:00 Clamping the Kerf Cut Insulation
Once the kerf cuts are made, it’s time to clamp the insulation in place. Here, we’ll show you the types of clamps we use and how to apply even pressure to hold the pieces together securely.
03:00 Trimming the Glued Insulation Flush to the Teardrop Trailer
After the insulation is glued and clamped, we'll carefully trim any excess to ensure it’s flush with the frame of the trailer. This step is crucial for getting a seamless fit before adding the final layers.
05:31 Light Pressure Is All You Need for the Gluing Process
When it comes to gluing the insulation, light pressure is the key. We’ll explain why you don’t need to overdo it with clamping force and how to get the perfect bond without damaging the materials.
06:26 Filling Any Cracks with Expanding Foam
In case of any gaps or cracks, we’ll show you how to use expanding foam to seal everything up, ensuring there are no air leaks and maximizing insulation efficiency.
08:22 Insulation Is Finished, Let’s Add Some Roof Bars
With the insulation in place, it’s time to add roof bars! We’ll walk you through the process of installing these, which will provide the support needed for the trailer’s roof structure.
09:35 Adding Extra Windows
We’re cutting in a few more windows! In this chapter, we’ll show you how to safely install additional windows to bring more light and ventilation into your teardrop trailer.
10:20 Applying the Final Skin of Plywood
Finally, we’ll cover the entire trailer with the last layer of plywood. This is the step where it all comes together, preparing the trailer for the fiberglass finish. Watch as we shape and secure the plywood for a smooth, durable surface.
What’s Next?
/ @orkiesworkshop
#TeardropCamperBuild #DIYCamper #TrailerPrep #OrkiesWorkshop #TeardropTrailer #CamperBuildSeries #VanLife #TinyHomeOnWheels #diyprojects
/ orkies_workshop
LINKS USED IN THE DESCRIPTION MAY OR MAY NOT BE AFFILIATE LINKS
As an Amazon Associate I earn from qualifying purchases. Orkie's Workshop is a participant in the Amazon Services LLC Associates Program, an affiliate advertising program designed to provide a means for sites to earn advertising fees by advertising and linking to Amazon.com.