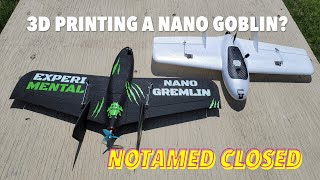
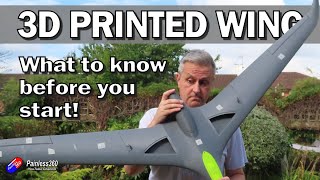
The Gremlin - Building a 3d Printed Nano Goblin

Ok, it's not a Nano Goblin, nor really even a clone. It is heavily inspired by it though, and created mostly because you can't get a Nano Goblin right now. Created by JwmFlying14 from RcGroups, this is a unique and interesting airframe which just may change your opinion on the viability of 3d printed airplanes. The plane is built around using a 2S or 3S 18650 battery pack.
Video is shown with Cura 4.13 on an Ender Pro. Cura 5 is giving some issues, however, Cura 5.1 Beta was working well. Some options are different between them though. If you have a direct drive printer your retraction settings will also be different.
If you plan to use 2S it is important you print light and probably a good idea to use the internal motor mount. For filament use either active or passive foamed LWPLA. Your settings should show you between 3035g for the main body.
For 3S the plane is more forgiving. I recommend the External motor mount as it is easier to work with. Still should try to print light though, as more material exists behind the CG then in front of it meaning the heavier you are the more weight you need up front to compensate. Recommend passive foamed LWPLA (Polylite LWPLA), though normal PLA or even PETG should work. Passive foamed or Prefoamed LWPLA can be printed with normal PLA settings and isn't so challenging to print as normal LWPLA. It still nets considerable weight savings.
Want to see how it flies? Check this out:
• The Gremlin Flying a 3d printed Nan...
Want a long winded video covering every detail from the design, testing, printing, building, and flying? Try this out:
• 3D Printing a Nano Goblin? Introdu...
Check the RCGroups page for more info:
https://www.rcgroups.com/forums/showt...
Get files from Cult3d here:
https://cults3d.com/en/3dmodel/vario...
0:00 Unplanned Disassembly
0:09 Planned Disassembly
0:29 Step 1 Printing
2:43 Step 2 Motor mount
3:15 Step 3 Elevons and rods
3:28 Step 4 Assemble hatch
3:50 Step 5 Install electronics
4:05 Step 6 Install servos
4:28 Step 7 Install wings
5:39 Step 8 Install Caddx Vista and camera
5:59 Step 9 Assemble nose
6:46 Step 10 Install wing leading edge
6:54 Step 11 Install vertical/tail fins
7:41 Step 12 Finish servo setup
8:06 Step 13 Final setup
8:51 Step 14 Go FLY!
Music from Uppbeat (free for Creators!):
https://uppbeat.io/t/fuguvibes/spatial
License code: OOHU4JUETUST9NOP
Music from Uppbeat (free for Creators!):
https://uppbeat.io/t/jonnyboyle/gyps...
License code: WT6EPL13O3QCBG5P