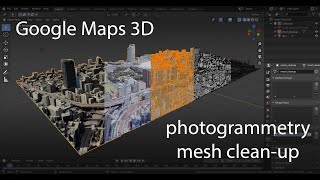
Tutorial – How to extract Google Maps meshes and import into Blender/Rhino/UE5 for reference (2024)

Imagery ©2024 Google, Imagery ©2024 CNES / Airbus, Lantmäteriet/Metria, Maxar Technologies, Map data ©2024
Timestamps:
0:08 [Intro] Introduction to tutorial
0:28 [Intro] Software requirements and installation of MapsModelsImporter and RenderDoc
2:54 [RenderDoc] Setting up
3:37 [Google Chrome] Opening a browser window with custom arguments, and injecting with RenderDoc
4:32 [Google Maps] Manipulating the LOD levels with the browser zoom level
6:15 [RenderDoc] Capturing a frame
6:49 [RenderDoc] Saving the capture and releasing the injection
7:07 [Blender] Importing the extracted meshes
8:08 [Blender] Simplifying the imported entities (joining objects and merging vertices by proximity)
11:05 [Blender] Applying transform data, making a duplicate and removing all material slots with a script
14:08 [Blender] Filling significant holes in the mesh manually
15:54 [MeshLab] Downloading and installing MeshLab for an efficient unwrapping process
17:04 [Blender] Exporting the mesh
17:30 [MeshLab] Unwrapping and exporting in MeshLab
19:25 [Blender] Importing the mesh, organizing and applying transform matrix
20:25 [Blender] Verifying the unwrapped faces
21:15 [Blender] Baking a projected texture
24:32 [Blender] If relevant, computing the bake process with the help of a discrete GPU will lower baking times
25:12 [Blender] Visually verifying the bake result, and saving the baked texture
26:57 [Blender] Exporting the mesh (again, now with UV coordinates)
27:33 [Rhino] Visualizing the mesh in Rhino
29:29 [Unreal Engine] Creating a new project in Unreal Engine
30:46 [Unreal Engine] Importing the mesh
32:28 [Unreal Engine] Creating a material and importing the baked texture
34:54 [Unreal Engine] Adding Ultra Dynamic Sky
37:42 [Unreal Engine] Adding a CineCamera actor
39:44 [Unreal Engine] Adding a Level Sequence
45:57 [Unreal Engine] Adding Depth of Field by adjusting the camera's aperture and focal point
50:09 [Unreal Engine] Activating Movie Render Queue and test rendering one frame
55:10 [Unreal Engine] Final rendering
57:11 [Unreal Engine] Resulting animation
.........................................
Links to free software:
https://www.blender.org/download/lts/ (Blender 3.6)
https://renderdoc.org/builds (RenderDoc 1.25)
https://github.com/eliemichel/MapsMod... (Maps Models Importer v0.6.2)
https://www.meshlab.net/#download
https://www.unrealengine.com/enUS/do...
Links to paid software:
https://www.rhino3d.com/download/
https://www.unrealengine.com/marketpl...
Link to previous tutorial (covering pitfalls and backtrackings):
• Tutorial – How to export 3D photogram...
.........................................
Copy and paste these two lines into a command prompt and execute to start Chrome in injectioncompatible mode – if you intend to use the 32bit Chrome application instead of the 64bit one, change 'Program Files\' to 'Program Files (x86)\':
set RENDERDOC_HOOK_EGL=0
"C:\Program Files\Google\Chrome\Application\chrome.exe" disablegpusandbox gpustartupdialog
.........................................
Python script to remove all material slots for selected object(s) in Blender:
"""(Copy and paste the below script in full, from and including the first line, to and including the final line, and press ENTER twice after pasting.)"""
import bpy
for ob in bpy.context.selected_editable_objects:
ob.active_material_index = 0
for i in range(len(ob.material_slots)):
bpy.ops.object.material_slot_remove({'object': ob})
"""(End of script.)"""
.........................................
Note:
The extrusion amount, set to 1 mm in the tutorial, was unnecessarily generous; 0.2 mm might have been a better value.
.........................................
This tutorial demonstrates to KTH Architecture students how to extract photogrammetry meshes from Google Maps – for reference – and import it in Blender, Rhino, Unreal Engine 5.
The operating system used for this tutorial is Windows 10. Running another operating system (e.g. Linux, MacOS) might amount to a different user experience or software incompatibility.
If you want to check in which computer room(s) any relevant software might be installed in – CADLAB, DFL, and ARCPLAN are in the KTH School of Architecture building – please check the following link for current status:
https://www.kth.se/en/student/it/camp...
Disclaimer:
This tutorial aims to increase student awareness of the versatility of the digital tools available for use within the context of the architectural education offered by KTH. As such, it might not be generally applicable, but on the other hand, if at least one architecture student is helped by it in fulfilling deliverables requirements, the purpose of this tutorial is satisfactorily achieved. There might be inaccuracies in this tutorial video – if you identify any significant one, please tell us in the comments.


![Google Maps to Blender 2023 WORKFLOW [NO BS GUIDE]](https://i.ytimg.com/vi/hrDW0Gh0tx4/mqdefault.jpg)