Use this REMOTE for your Next DIY PROJECT!

How to Make Simple DIY Wireless RC Remote Control Using Arduino and NRF24l01 for RC Control RC Car Boat Robot Etc.
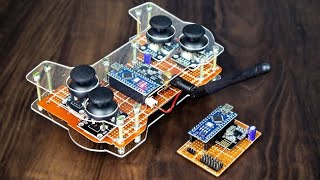
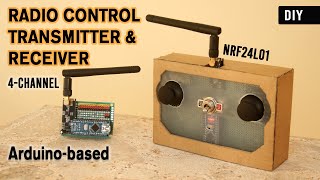
In this video, i have made a simple DIY Wireless RC Remote Control Transmitter and Receiver
using arduino nano and NRF24l01 wireless transceiver module.
you can find a detailed explanation along with links to schematics, parts and components used, in this description below.
this wireless remote and receiver kit is made on a small PCB perfboard and is very easy to make.
i have soldered all the connections using thin wire core and solder wire.
it can be used to control many projects such as robotic arm, RC car, Drone, Etc.
it features 2 channel control which can control 4 output pins on the receiver
i have used 2 arduino nano microcontrollers. one for the transmitter and another one for the receiver.
the arduino board takes input from the joystick module,
converts it into a character string, and sends it to the receiver via the NRF24l01 transceiver module.
For the Transmitter, i have used the NRF24l01 Transceiver module with SMA antenna for enhanced range.
for the receiver i have used the module without antenna, but you can use one with antenna on the receiver too,
to get enhanced range.
i used a joystick module on the transmitter to send data to the receiver over radio using the NRF24l01.
the receiver receives the data and uses the digital pins as output to send the received data as a control signal.
the signal can be either simple on/off, or it can be a PWM output to have variable range of control.
for eg: to control speed of RC car.
on the receiver i have 4 female header pins to connect to the device to be controlled.
make sure you do not connect any high power device directly to these pins, as the arduino cannot handle currents
more than a few milliamps.
you can use drivers such as H Bridge motor drivers, or ESCs for brushless motors, to control motors.
for any other switching application you can use MOSFETS to amplify the current for large power devices.
Links:
Schematics:
Remote: https://bit.ly/33Uc1jg
Receiver: https://bit.ly/30QWy1n
Code:
Transmitter Code: https://bit.ly/2DDok8Z
Receiver Code: https://bit.ly/3kF5TRB
Product Links:
Arduino Nano: https://bit.ly/ArdNano
NRF24L01 with antenna: https://bit.ly/NrF24L01
NRF24l01 module: https://bit.ly/3h2jIHy
NRF24L01 Adapter Base: https://bit.ly/30RSJZX
Joystick Module: https://bit.ly/2POeovH
Perfboard PCB Board: https://bit.ly/31LbYDx
Female Header Pins: https://bit.ly/3fSD7tj
Solder Iron i Use: http://bit.ly/2GSArih
Helping Hand Magnifier: http://bit.ly/2Uh11oe
arduino UNO with Micro USB port: http://bit.ly/aRdUiNo
also do check out these cool 3d Printers:
Creality Ender 3 pro : http://bit.ly/36m1POI
Creality CR10s pro: http://bit.ly/2QmqU6z
check out my channel for such cool project videos:
/ superbtech
check these useful tutorials
NRF24l01 Tutorial: • NRF24L01 Arduino Tutorial Wireless ...
Arduino Beginner Tutorial: • Arduino EXPLAINED
Arduino Buttons Tutorial: • Toggle/Momentary Push Button with Ard...
Joystick Tutorial: • Control Servo Motor with Joystick A...
DIY 3d Printer Project: • How to Make 3D Printer Using Arduino ...
DIY lab bench power supply: • How to make Simple Lab Bench Power Su...
DIY portable power supply: • 3D Printed Portable Power Supply
DIY Power Bank: • How to Make Power Bank at Home | DIY ...
#Remote #RemoteControl #RCTransmitter #RadioControl #Arduino