Using Sprites to Create an Arduino Speedometer | Beginner How To on Using and Compositing Sprites

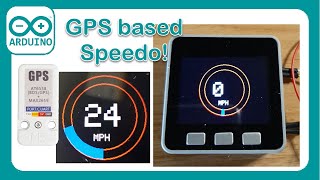
In this video we are going to expand on the GPS based speedo by using Sprites. Sprites allow us to predraw images into RAM and then display them all at once. Using a technique of compositing sprites together we will be able to create a Sprite for the gauge dial and one for the needle that can be rotated and positioned. Using this method will help eliminate any flickering we see while drawing complex gauges on the screen in real time.
In the video we will explore the basics of using sprites for this type of design but we won't focus on the actual gauge shapes. That code is provided and we will review what is going on.
Here are some helpful resources. If you are not using an M5Stack you will want to explore the TFT_eSPI library and examples for how to set up the Sprite object. The M5Stack.h library calls on Sprite.h which is an adaptation of the same library. The main difference is how you initialize the objects and what libraries you need to include. Examples should get you there.
https://github.com/Bodmer/TFT_eSPI
https://github.com/m5stack/M5Stack/bl...
Sample program, note that angled brackets aren't allow in YT text so you will need to add them everywhere you see /\ This is less than in for loops and around the M5Stack.h library
#define WAIT 0
#define DEG2RAD 0.0174532925
const int minSpeed = 0;
const int maxSpeed = 100;
const int lcdWidth = 320;
const int lcdHeight = 240;
const int gaugeRad = 105;
const int gaugeWidth = 25;
const int gaugeWidth2 = 10;
const int xLoc = lcdWidth / 2;
const int yLoc = lcdHeight / 2;
const int gaugeDelay = 50;
#include /\M5Stack.h/\
TFT_eSprite dial = TFT_eSprite(&M5.Lcd); // Create Sprite object for the dial
TFT_eSprite needle = TFT_eSprite(&M5.Lcd); // Create Sprite object for the needle
void setup(void) {
M5.begin();
M5.Power.begin();
M5.Lcd.fillScreen(TFT_BLACK);
drawBackground(0);
createNeedle();
}
void loop() {
// put your main code here, to run repeatedly:
for (int rot = 0; rot /\ 270; rot+=5){
plotGauge(rot, "MPH");
delay(25);
yield();
}
//needle.deleteSprite();
//dial.deleteSprite();
}
void plotGauge(int16_t angle, String label){
//Draw the blank gauge
//M5.Lcd.setPivot(160, 120);
drawBackground(angle);
needle.pushRotated(&dial, angle, TFT_TRANSPARENT);
dial.pushSprite(0,0,TFT_TRANSPARENT);
}
void drawBackground(int16_t speed){
dial.setColorDepth(8);
dial.createSprite(lcdWidth, lcdHeight);
dial.setPivot(lcdWidth/2, lcdHeight/2);
M5.Lcd.setPivot(lcdWidth/2, lcdHeight/2);
dial.fillScreen(BLACK);
dial.drawRoundRect(0,0,lcdWidth, lcdHeight2,10,WHITE);
dial.drawRoundRect(2,2,lcdWidth4, lcdHeight6,8,WHITE);
dial.drawRoundRect(4,4,lcdWidth8, lcdHeight10,6,WHITE);
dial.fillCircle(lcdWidth/2, lcdHeight/2, gaugeRad, WHITE);
dial.fillCircle(lcdWidth/2, lcdHeight/2, gaugeRad + 2, RED);
dial.fillRoundRect(lcdWidth/2, lcdHeight/2,lcdWidth/2 11, lcdHeight/2 12, 5, RED);
dial.fillRoundRect(lcdWidth/2, lcdHeight/2,lcdWidth/2 13, lcdHeight/2 14, 5, RED);
dial.fillCircle(lcdWidth/2, lcdHeight/2, gaugeRad 3, WHITE);
dial.fillCircle(lcdWidth/2, lcdHeight/2, 5, RED);
dial.fillRoundRect(lcdWidth/2 + 4, lcdHeight/2 + 4,lcdWidth/2 21, lcdHeight/2 21, 4, BLACK);
for (int i = 0; i /\ 271; i+=20){
float sx = cos((i 270) * DEG2RAD);
float sy = sin((i 270) * DEG2RAD);
uint16_t x0 = sx * (gaugeRad gaugeWidth) + xLoc;
uint16_t y0 = sy * (gaugeRad gaugeWidth) + yLoc;
uint16_t x1 = sx * (gaugeRad) + xLoc;
uint16_t y1 = sy * (gaugeRad) + yLoc;
dial.drawLine(x0, y0, x1, y1, BLUE);
}
for (int j = 0; j /\ 270; j+=2){
float sx = cos((j 270) * DEG2RAD);
float sy = sin((j 270) * DEG2RAD);
uint16_t x0 = sx * (gaugeRad gaugeWidth2) + xLoc;
uint16_t y0 = sy * (gaugeRad gaugeWidth2) + yLoc;
uint16_t x1 = sx * (gaugeRad) + xLoc;
uint16_t y1 = sy * (gaugeRad) + yLoc;
dial.drawLine(x0, y0, x1, y1, BLACK);
}
int speedU = map(speed, 0, 270, 0, 120);
dial.drawNumber(speedU, 190, 140, 7);
dial.drawString("MPH",210,198,4);
}
void createNeedle(){
needle.setColorDepth(8);
needle.createSprite(20,100);
needle.fillSprite(TFT_TRANSPARENT);
needle.fillCircle(10,10,5,TFT_RED);
needle.fillRect(8,2,4,100,TFT_RED);
needle.fillTriangle(6,4,14,4,10,94,TFT_RED);
needle.fillCircle(10,10,8,TFT_BLACK);
needle.setPivot(10,10);
}
00:00 Introduction
00:15 Introduction to Sprites in MS PAINT
12:56 Getting Started Discussion
14:00 Getting Started with Sprites in Arduino
43:08 Reviewing a Sprite Based Gauge
58:04 Next Steps and Conclusion


![Developing Embedded GUI with SquareLine Studio [2/2]](https://i.ytimg.com/vi/b_4m1A3A2yw/mqdefault.jpg)